You are using an out of date browser. It may not display this or other websites correctly.
You should upgrade or use an alternative browser.
You should upgrade or use an alternative browser.
Safety Razor Case Restore
- Thread starter Honedright
- Start date
Flintstone65
Imagining solutions for imaginary problems
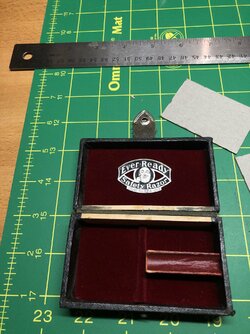
Beautiful job!!! Couldn't decide on my response emoji -- Wow or Love -- had to go with the Love, that is awesome!Inspired by another thread, I thought I’d try restoring the inside of one of my Ever Ready cases. Still more to do, but so far I’ve done this:
Before
View attachment 1810265
After
View attachment 1810267
Still waiting on some additional materials to arrive before I complete this project.
- Thread starter
- #3
Here’s the finished product:

And with a razor

I’m pretty happy with the results considering that this is my first attempt.
Next I’m going to try a complete inside and out restoration with a partial rebuild of the wood box and a complete wrap of the exterior.
And with a razor
I’m pretty happy with the results considering that this is my first attempt.
Next I’m going to try a complete inside and out restoration with a partial rebuild of the wood box and a complete wrap of the exterior.
I'd be happy with those resultsHere’s the finished product:
View attachment 1814155
And with a razor
View attachment 1814156
I’m pretty happy with the results considering that this is my first attempt.
Next I’m going to try a complete inside and out restoration with a partial rebuild of the wood box and a complete wrap of the exterior.
hmmm full outer wrap?? I think I LACK the tolerance level to do that
- Thread starter
- #5
Well, the box I’m considering is pretty trashed, so it couldn’t get much worse. I’m watching several videos of a paper crafts/ book binding pro who teaches how to wrap and line boxes. Looks easy, but I know better…hmmm full outer wrap?? I think I LACK the tolerance level to do that
Seems a bit daunting, but nothing ventured, nothing gained - as the saying goes.
Nice job.

Uhuh uhuh ... Cases of ill repute, I can't throw them out, I can't make myself fix them, lack the enthusiasm, but one day when I'm old, like in 50 years time, I'll have a treasure chest of jobs to finishWell, the box I’m considering is pretty trashed, so it couldn’t get much worse. I’m watching several videos of a paper crafts/ book binding pro who teaches how to wrap and line boxes. Looks easy, but I know better…
Seems a bit daunting, but nothing ventured, nothing gained - as the saying goes.
Note the use of GENUINE real latex clamps

and it ended up .. filed under later ron, much later ron, like 50 years
only reason it got this far was the leather snap closure was intact or it would have been filed earlier than it was
Very nice
- Thread starter
- #9
Yeah, mine is not quite that far gone, but one of the sides is detached and alot of the black paper “faux” leather is gone. I’ll have to rebuild the finger joints and reglue the top of the lid. I’m not quite ready to dive in, but soon. It is kind of interesting to learn how these were built by taking them apart. They are rather cheaply made, but probably better than anything that would be mass produced today. I can imagine several workers at benches slapping them together a hundred or more a day.Uhuh uhuh ... Cases of ill repute, I can't throw them out, I can't make myself fix them, lack the enthusiasm, but one day when I'm old, like in 50 years time, I'll have a treasure chest of jobs to finishthat are worth a bleedin Mint

View attachment 1814208
Note the use of GENUINE real latex clamps
and it ended up .. filed under later ron, much later ron, like 50 years
View attachment 1814209
only reason it got this far was the leather snap closure was intact or it would have been filed earlier than it was
Yesterday I just purchased a Shovel head with that case. It does not look as good as your pre restored. Good for you. Sounds like you have talent.Inspired by another thread, I thought I’d try restoring the inside of one of my Ever Ready cases. Still more to do, but so far I’ve done this:
Before
View attachment 1810265
After
View attachment 1810267
Still waiting on some additional materials to arrive before I complete this project.
Similar threads
- Replies
- 4
- Views
- 882
- Replies
- 4
- Views
- 613
- Replies
- 28
- Views
- 3K
- Replies
- 16
- Views
- 1K

