
Creating the Initial Bevel… (With a Norton 4K)
Creating the initial bevel means to a certain extent doing 2 things. First – if the razor for some reason doesn’t have a completely flat/even edge and/or spine – in this stage this will be resolved and the spine/blade angle will become consistent and flat. Secondly in this stage you are creating the initial/consistent edge, which should usually result in the ability to pop hairs off of your arm right off of the 4K side of the Norton. Now, the 4K is not the only hone that can/will set the initial bevel, and in fact for some problematic razors, or razors that are pretty beat up, you would ideally want a coarser grit in order to remove metal faster/easier and create the initial bevel quicker – in this example the Norton is used as just that… and example. The same general idea/principle can be applied across a myriad of hones. The Norton is being used in this example due to how common it is, and the fact that most will rarely have to go to a lower grit than 4K in order to establish a bevel/consistent edge.
A quick disclaimer before we start… honing is NOT a straightforward topic… in fact if anything it’s an exceptionally vague and personalized process. Nearly every fella that’s been honing razors for more than a year has a slightly different way of doing it, and almost EVERY razor is going to be different, as even 2 new razors, the exact same model and the exact same brand can be radically different to hone, as one might be just about ready out of the box, and the other could require a fair amount of work. This is by no means a “one size fits all” method of honing, and to a certain extent is a touch vague, and it is so on purpose. This tutorial should give you the basic principles and tools, but the final product will be primarily trial and error on your part. In this tutorial, I am approaching this razor as if it was an average new razor straight from the factory, so this isn’t a razor that needs a lot of work. If you have troubles or are finding yourself spending more than 10-15 minutes on this stage, immediately stop, and post what you are doing, the problems you are having, the type of razor, and any other helpful information regarding your equipment and problems in the honing section/forum here at B&B and we’ll help you out! One more note – I can’t say enough how important it is to make sure your hone has been lapped and is completely flat.
All right, back to business – how to create the initial bevel with the 4K side of a Norton.
Step 1 – Soak your Norton…..

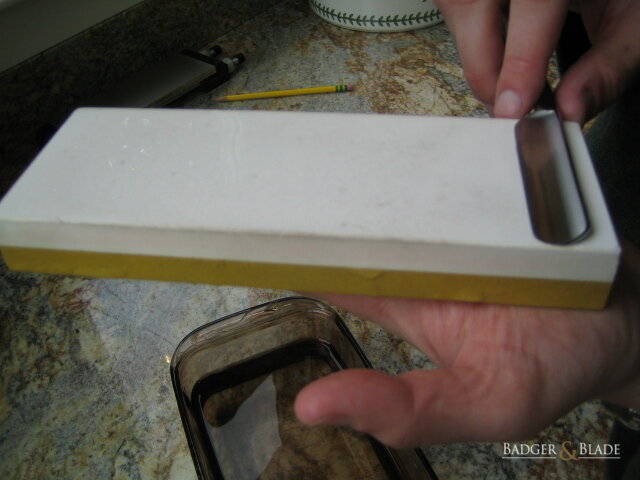
Step 2 – Pull your Norton out of the water and hold it with the white (4000 grit) side facing up….

Step 3 – Carefully lay the spine of the razor on the hone (keeping the blade off of the hone), and slowly lower the blade flat onto the hone adding NO pressure...
Step 4 – Using NO pressure, slide the razor straight across the hone. Some lead with the heel out of habit, however this is not necessary on the Norton due to its size. Again – use NO pressure, let the hone do the work. Keep the razors spine and blade completely flat against the hone during the entire forward motion - again keep in mind, no downward pressure and keep the motion as steady as possible. This motion does not need to be quick, and can actually be quite slow, the object of the exercise is as flat and steady as possible – speed wholly unimportant. (Note: in some cases is the Norton is your only stone, you can/should use pressure, however in this example, we are assuming the razor is in pretty good shape, and it is a factory fresh, new razor)


Step 5 – As you reach the end of the hone, do NOT just pick the razor up, as at all times you want the spine of the razor on the hone. The correct way to prepare for the second half of the first complete “pass” or “stroke” is to roll the razor, picking the edge of the razor off of the hone, and turning the razor around in the opposite direction. This is important, as if you roll the razor in the opposite manner, it will push the blade into the hone, thus being counterproductive and rolling the cutting edge of the razor, and significantly dulling the razors edge...


Step 6 – With the razor now facing the opposite direction (towards you) slide the blade in the same fashion as above, towards you.

Step 7 – Roll the razor as you had done in Step 5 - roll the razor, picking the edge of the razor off of the hone, and turning the razor around in the opposite direction.
Step 8 – Repeat this process about 4 more times, for a total of 5 front AND back strokes.
Step 9 – Typically this is about all that is needed for a new razor – 5 front and back strokes on the 4K side of a Norton, HOWEVER it is not uncommon at all to need more. If the razors spine and blade feel completely flat on the hone, this should be all that is needed. The best way to tell if the razor is properly honed at this stage unfortunately is to move onto the next stage – polishing/establishing the initial shaving sharp edge, and testing the shaving sharp edge. Personally, I try to shave a little bit of hair on my arm, or back of my hand and based on how easy, or difficult it is to pop the hairs off, I can gauge how much more time on the 4K the edge needed. Sometimes I end up over honing on this stage, which means the microscopic “fin” I had created with the hone had broken off, or folded and I have to back hone. Back honing is quite simple - it is basically doing the opposite motion on the hone, so you are dragging the razor spine first on the hone, but remember you still want to roll the razor on the spine, NOT the edge to switch directions. Again, this is where honing can become difficult/tricky – and it takes experience to know when a razor is ready to move onto the next stage, or when you have over honed, so make sure to ask questions on the forum in the honing section – but armed with the above, you’ll be able to take experienced members advice/suggestions and put them to good use!
Step 10 - Rinse off the razor with running water (be careful not to hit the faucet with the edge you just honed!) so as to remove any grit/residue the 4K side of the Norton may have left on the razor...

If you happen to be stopping at this stage for any reason (due to time constraints, or you happen to run into a problem and need/want to ask questions on the forum) make SURE to carefully wipe ALL of the water off of the blade with a towel/cloth as shown below. Do not touch the cutting edge with the cloth directly - instead to make sure it is dry, do a very light "stropping" on the towel...


PROCEED TO THE NEXT SECTION OF THE GUIDE - Section 6 - 3, Polishing/establishing the shaving sharp edge
BACK TO THE TABLE OF CONTENTS
Last edited by a moderator:
")
