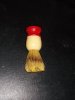
So I set about attempting my first brush restoration Ever Ready C40. Used a whipped dog synthetic for the job. Including my lessons learned and some pictures. I am calling this a success for now. Used it for my shave today was pleased will the results.
You are using an out of date browser. It may not display this or other websites correctly.
You should upgrade or use an alternative browser.
You should upgrade or use an alternative browser.
First brush restoration
- Thread starter VW_ninja
- Start date
- Thread starter
- #2
- Thread starter
- #3

- Thread starter
- #4
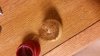
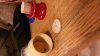
Now when drilling out the knot this thing will make a mess. I used the saw blade on my Gerber to hold the knot and saw if off towards the base. This worked fairly well for me. Might want to do this over a trash can will make a fairly big mess. As well as drilling makes a mess too so if you can do this in a container it will help. I suggest drill just one not in the center and making that whole bigger then using a rotary tool with a sanding drum to clean it out. I also, suggest using tape to protect the handle I broke a chunk off and crazy glued it back on. I also suggest using a particle mask while working so not to inhale the powder. Now as far as drill depth goes. I drilled all the way through on mine. To avoid this I suggest taking some masking tape and putting it on the drill bit so you know how far you are going.
- Thread starter
- #5
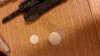
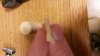
Since I drilled all the way through on mine I got a wine cork and trimmed some of it off to set the height of the knot. I got lucky and only had to make one cut. I used epoxy to hold the cork in place. I also went a little larger boring at the hole to fix this i just applied extra epoxy to the bottom of the knot to fill the void. Since the handle was in two pieces this was fairly easy to do. But, be careful not too much or it could run into the new knot. Before putting the handle back together I used some crazy glue to try and hold it together. I suggest use tape around both parts because when you push it out. The glue will get on the handle.
Attachments
- Thread starter
- #6
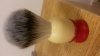
For the glue that go onto the handle I tried to scrap some off with a knife, razor blade, tweezers, metal finger nail file that is included with the clippers. I also use some 2000 grit sand paper to remove build up. I alternated between the improvised tools and the sandpaper. Took a while. Had I used tape I do not think this would have been an issue. And, finally the finished product. You can see the chunk I took out with the drill. Over all I happy with it and learned a lot. Will probably do another one at some point. I used the loctite that came with the needle or what ever you want to call it. This was handy for filling the gaps and adding some extra to the bottom of the cork. http://www.loctiteproducts.com/p/13/6/epxy_5min/overview/Loctite-Instant-Mix-5-Minute-Epoxy.htm
Attachments
Well done. Congrats.
- Thread starter
- #8
Thanks appreciate it.Well done. Congrats.
Very nice, congratulations.


Great job.
- Thread starter
- #11
Thank you all for the positive feed back. Think I might do another one in the future. Also, Larry from Whipped Dog was very helpful and I am happy with the knot he provided. I recommend both him and his products.
Similar threads
- Replies
- 4
- Views
- 2K
- Replies
- 18
- Views
- 1K