Check the OCtober thread. [emoji12]I didn't see pictures so it didn't happen.
I'll post better pics tomorrow, in the same thread.
Check the OCtober thread. [emoji12]I didn't see pictures so it didn't happen.
Canadian,eh? You know, I got myself a Canadian #77 too. [emoji12]
I will for sure.Using imatabor's tutorial, can you disassemble it and take some pictures of the Canadian #77?
In the pics in other thread, it looks like you may have already applied some DHMO ...
 but its plating is still half decent, except for the top cap.
Hey, I've seen this photo in your listing on eBay.I followed the instructions EXACTLY, but my razor doesn't look like your last pic. HELP! [emoji53]
Oh yeah, that's a whole different ball game there. Imatabor would have to start a new thread outlining the proper direction for the TTO style razors. I'd certainly subscribe to it!I've been using post-it notes attached to each of the three pieces to keep track of the order of assembly, but it is difficult to keep them dry enough while using the razor to shave. As soon as I rinse it, at least one falls off in the sink and then it's back to square one again and revisiting the tutorial of the OP. I may just forget the whole thing and go TTO but, then there's the whole "which way to tighten, which way to loosen" thing.
I followed the instructions EXACTLY, but my razor doesn't look like your last pic. HELP! [emoji53]
Using imatabor's tutorial, can you disassemble it and take some pictures of the Canadian #77?
In the pics in other thread, it looks like you may have already applied some DHMO ...

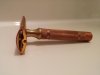
Here's the somewhat decent pics. The big difference is mostly the different handle and instead of patent #s we see the dates.
The corner tabs are very similar to the English NEW with this base plate, they shave very similarly too.
Enough now, before I turn this into a serious thread ...
View attachment 510453
with English-style top cap and handle


Thanks for the pictures! That looks like the perfect handle for me.
Now I know what I'm after.
PS. Oh, and I need to find two cases - one to send your way, right?
 Yup, I DEFINITELY need one of those cases ...
threadjack much?
Back to the original topic. This morning I tried using the OP's tutorial to disassemble my Gillette NEW but I ran into the serious and seemingly insurmountable problem that I apparently don't have one.
What is the procedure in this situation?
I did try this with my Merkur 23C, and also with a RazoRock Mission. While I cannot verify the technique for a Gillette NEW, it worked quite fine with said razors. (The motion may seem a bit awkward the first couple of times, but rest assured that your razor will separate in quite the same way as with OP's twisting of the handle.)Lately there have been quite a few threads on disassembling various razors. Our very our Captain Murphy has started threads on the Fatboy, the Slim and Open Comb TTO. These threads have been very educational. Yet I am surprised that one of the most beloved razors has been neglected, The NEW.
(...)
Here is the razor (...)
I then proceeded to grab the head by the ends (I would suggest not getting use to grabbing the head by the long edges as there may be a blade and you may cut yourself). Take the handle in your other hand and twist the handle in a counter clockwise direction. You may be able to hold the handle still and rotate the head clockwise. While I haven't done this myself I see no reason this wouldn't work. (If a member here can verify this it would be most helpful)
(...)
Living in the northern part of this world, I have full access to nonwet water most of the year, and so I've been able to experiment a bit. While this nonwet water (or "solid water" as I've heard someone call it) appears to be different from wet water, I found that it's attributes become very similar when you heat the nonwet water. What I do first is to bring the nonwet water to boiling temperature, and then wait for about 5 minutes to let it stabilize. Then it can be used just like I would normally use wet water.I have had mixed results from various water types. I think the important thing that the ones that work have in common is that they are the wet type. I've used the nonwet variety and no matter how hot or cold it was it just won't work.
This may be a YMMV thing but I wouldn't waste my time with the nonwet water.