What's new

Slim adjustable internals and disassembly

Hi all,
I have been looking around for info on the workings of the slim.
There is a lot of good info (thanks to those previously posting on this) on how to get the cap of etc, mostly directed at the fat boy and so lacking a few details.
S0..
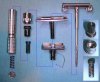
I decided to take mine apart.
In doing so it has made clear a few points. Assuming a working razor in good condition. This is a 1962.

It is perfectly OK to adjust with the TTO tight. The spring takes up for this and is one of the main reasons it's there, that and providing all the blade clamping force.

Re-assembly is not purely the reverse of removal !! some dimensions need to be set if the setting Numbers are to match prior positions.

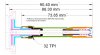
I have far to much time on my hands .... I decided to measure it accurately draw it in CAD:blink:

I Hope all this effort will be useful to others.:biggrin1:
Anyone want further info,bigger pictures etc please ask.
P.S. No razors were harmed in this process, it's back together and working fine.
 

Attachments

  • $Gillette slim adjustable hatchsolid.jpg
    $Gillette slim adjustable hatchsolid.jpg
    29.8 KB · Views: 1,827
  • $slimwlines.jpg
    $slimwlines.jpg
    60.6 KB · Views: 1,991
Fantastic information! This will be useful to many I'm sure.

Should also put this into the wiki
 
massive props.

The only thing I ever hear about disassembly is DON'T DO IT!! Also the fact you mention that blade adjustment can be done with the doors closed is pretty interesting. Can you explain more on the reassembly part?
 
Using the terms I used when drawing (please correct me if parts have proper names)
the numbers on the adjuster knob (brown) have a relationship to the start of the thread on the adjuster collet (black).
This could be marked but I found it easier to measure.
After pressing in the collet and attaching the knob it can be screwed on to the previous dimension - it is then known that the #1 should line up with the click spring slot at this point. The adjuster plate (blue) is then inserted as such and the guard plate (pink) pressed in to the 86.3mm dimension.
It should be noted that these measurements will probably vary a bit between razors.
Hope that's clear enough it's hard using words and had me scratching my head for while :001_unsur
 
massive props.

The only thing I ever hear about disassembly is DON'T DO IT!! Also the fact you mention that blade adjustment can be done with the doors closed is pretty interesting. Can you explain more on the reassembly part?

+1
All I've ever read on the adjustables say to never change the adjustment with the silo doors closed tight. This tidbit of not harming the razor adjusting while it's closed is great info for sure.
 
How do you get the dial off, adjuster pin as well as the adjuster plate? Do you need a screwdriver to put down the handle?
 
How do you get the dial off, adjuster pin as well as the adjuster plate? Do you need a screwdriver to put down the handle?

(I would not suggest anyone actually tries this but if you do please -- Before starting ensure dimensions are taken and you have the equipment to compress the spring and re-crimp the cap at the same time!)

after getting the centre bar (red outline) out, a piece of brass or aluminium (ie soft, not a screwdriver) rod down through the (black) collet can be used to tap gently against the (grey) screw while supporting under the adjuster plate (L blue). This could pop of the TTO knob which is not wanted so only try at your own risk !!!!!!.:001_unsur
 
Very nice job detailing the assembly of a Slim. This will be of help to many, I'm sure!

I am one of the vocal ones that warn not to take these razors apart unless needed, since they really weren't engineered to be taken apart and repaired. Many times they are disassembled to "fix" a problem that is cured by a long, hot, soapy bath. Your documentation and measurements are great for those instances when disassembly is warranted.

I am also among the ones who say "horsehockey" to the "don't adjust when closed" advice. If one understands the purpose for and working of the compression spring, one can see that adjusting "on the fly" is just fine! (I must admit that I repeated the "don't do it" cry until I myself came to understand.) The exploded view allows for a good look at how it works and should help others understand as well.

About the only advice I'd give at this point is not to remove the collet and dial from the handle unless absolutely needed to avoid the (now obvious) calibration issue.

Great job, Steve . . . thanks!!
 
How do you get the dial off, adjuster pin as well as the adjuster plate? Do you need a screwdriver to put down the handle?

The Slim is too "slim" to get any sort of drift pin to tap the assembly apart like can be done with a Fat Boy. To remove the head, pad the handle with a rag and grip the handle tube with vise grip pliers. Get a firm grip on the head assembly and gently "unthread" it from the handle. The head should back out of the collet with minimal effort, and the collet stays inside the handle tube.

Once the head assembly (base plate and adjuster tang) is removed, the index spring will fall out (be careful not to lose or break it) and then the adjuster dial can be unthreaded from the collet.
 
[Part QUOTE=BBrad;4646118]
About the only advice I'd give at this point is not to remove the collet and dial from the handle unless absolutely needed to avoid the (now obvious) calibration issue.[/QUOTE]

Thanks for the kind comments BBrad. The issue on the calibration though is that the guard plate presses in at any rotational position relative to the collet so it's really only the centre bar that can be removed without re-setting.
 
Top Bottom