What kind of microbolts do yinz use?
You are using an out of date browser. It may not display this or other websites correctly.
You should upgrade or use an alternative browser.
You should upgrade or use an alternative browser.
What's on your work bench right now?
- Thread starter Luecke2326
- Start date
Miniature screws/bolts from sr_manufacture on eBay. He is not listing any right now. I would ping him.

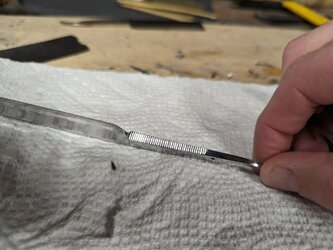
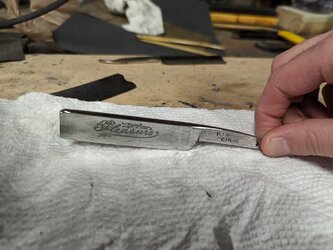
Finished the scales for the G. Johnson.

And made new shoes for the Bengall.

Bonus pic.

And made new shoes for the Bengall.
Bonus pic.
I just checked to see if you messaged me a little while ago and was surprised I hadn’t heard from you. Lol
Both razors look fantastic you nailed it with the scales Frank and your pinning is better than anything I could do! Cograts my friend!!
Both razors look fantastic you nailed it with the scales Frank and your pinning is better than anything I could do! Cograts my friend!!
Thanks, Scott (@life2short1971)! Took me forever to become proficient at peening/pinning. After hearing guys talk about bending pins, I was too cautious and ended up with too small heads. Once I started to hit the pin harder and figured out how to get the hammer to bounce and "hum" with the pin, things took a turn in the right direction. My analogy is Ringo Starr playing his hi-hat cymbals.
For both pairs of scales, I used the belt sander wheel to begin beveling the edge and rounding the tops. At first, I tried to stand and hold the scales like Brad does in this video. In this position, I cannot see the bevel against the sandpaper and how it is being formed:
I then remembered watching this Lewis Razors video around 7:40 and tried standing facing the wheel and using the bottom portion of the wheel and, voila, I can see the bevel form. Game changer!
Done, done. Shaves great!

Great work Frank. Thats a keeper!
Thanks, Scott.
“Miniature screws/bolts from sr_manufacture on eBay. He is not listing any right now. I would ping him.”
You can easily make a pair by gluing 3-4 brass nuts to a brass bolt from Micro Fasteners. Years ago, I made a pair before they were sold on eBay.
Just thread the nuts on the bolt, tack in place with a drop of CA, then glue to the bolt.
Thread another set of nuts, tack in place with another drop of thick CA, hit with Kicker and remove and glue with more CA. You can wax the threads to prevent sticking.
Really not a big deal as you have to buy a bag of nuts and bolts. The ones on eBay are nicer, and well made but as said no longer for sale.
Mocking up with bolts can save a lot of hassle before pinning.
Nice work, BTW.
The Fisher Price version is cute and all but I only ever needed the head of the bolt and one simple nut/washer to set scales up.
Stainless 0-80 x 1" hex or Phillips, with appropriate nuts and washers are readily available. I also kept 1/2" and 3/4" on hand.
Fastener express, Grainiger, Aspen, etc.
0-80 threaded rod and standoffs are findable too.
Stainless 0-80 x 1" hex or Phillips, with appropriate nuts and washers are readily available. I also kept 1/2" and 3/4" on hand.
Fastener express, Grainiger, Aspen, etc.
0-80 threaded rod and standoffs are findable too.
Last edited:
First few hours of the weekend on my bench summed up in one pic.

Maybe pick up a cheap fountain pen in that pattern and try some cutting/solvent weldingI have a challenging project I am about to attempt. Pickuped a very low mileage Gloubesman with a .880 wide blade for a song
because it is missing a tip. Going to give it one try to make what is not there before if gets a rescale.
View attachment 697012
View attachment 697011
timwcic
"Look what I found"
Thanks for the idea, never gave that a thought. I did do a repair years ago using pin stock and epoxy. I worked well and held up, still in rotation todayMaybe pick up a cheap fountain pen in that pattern and try some cutting/solvent welding
Globusman Resurrection
Pick up this Globusman for a song because it is missing a tip that broke off at the pin. It is just to beautiful to give it a rescale, with a blade that is .880 inches wide. Been looking and thinking how to make a new tip for a month. This is the results. To give the tip strength at the...
This Prior blade was sticking out the bottom of its scales by enough to slice a finger. I added a third pin and a spacer to block the tang from going too low. Did a little polishing while I had it on the bench.

Just waiting for pin material to come in to put it all back together, but very very happy with how this one came along. Was in decent shape to begin with but happy with the polishing performance.
Attachments
Another, this time a "Celebrated Hollow Ground" W&B 15/16". This didn't come out as good as I would have hoped, thought it was cleaner under the corrosion / gunk. Either way, came out decent enough. Thoughts?


Last edited:
Looks good. Think on the bright side - you have brought this razor back to life.
Thanks! Yeah it's very satisfying saving something old. Also a good low cost way to try out a big, heavy Sheffield blade.

I acquired a Bingham SR to restore some time ago. I knew it had the wrong scales but I wasn't sure what design or material to use. In the end, I decided on a traditional shape and black acrylic. I carved the design on a mini CNC last night, and while that was going on, I did some cleaning on the blade. This morning I sanded the scales and now they're ready for polishing. I really like the profile on this Bingham, and the thumb notch is a plus. I'll post another picture when this little project is complete.

The scale at the bottom of the picture is what I removed from the SR.

The scale at the bottom of the picture is what I removed from the SR.
Last edited:
I recently acquired a W. Gilchrist wedge, this is a 1860’s razor. Restoration had 3 parts - 1) reducing the corrosion on the blade 2) polishing the scales, 3) reprofiling the stabilizer which was definitely in a position to distort the honing process. Before and After below.
Before

After

The scale sanding could be better - I was trying to go easy so as not to erase the initials carved on both sides. But can always go back and touch it up later.
Before
After
The scale sanding could be better - I was trying to go easy so as not to erase the initials carved on both sides. But can always go back and touch it up later.
Similar threads
- Replies
- 7
- Views
- 804
- Replies
- 28
- Views
- 2K
- Replies
- 29
- Views
- 4K
- Replies
- 18
- Views
- 1K