What's new

Vintage Brush Restoration Timeline

I was checking out some antique stores last week and picked up these two brushes for a few dollars. The red one is an Ever Ready 50 CA and the ivory one is an Erskine (no model number). Both have well-worn badger knots and are basically unusable as-is.

What I'm going to do is document my step-by-step process for restoring these brushes to working condition. I'll post updates over the next few weeks as I progress.

IMG_0022-2.jpg


IMG_0024-2.jpg


At this point, nothing has been done other than a quick cleaning. My first step will be to cut down the bristles and drill out the knots. I'll post updates to this thread as I complete the steps.
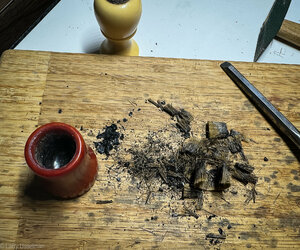
 
Part #2 - Cutting off the knots.

Using a sharp, sturdy knife, I sliced off the bristles flush with top of the brush. The red Ever Ready cut off easily, but the Erskine required some significant effort, due to the adhesive wicked up into the knot.

IMG_0026.jpg
 
Part #4 - Cleaning out the cavity.

My favorite tool for this is an old, narrow (1/4") wood chisel I picked up at a flea market. I've tried using Forstner drill bits but I don't feel I have the control. Starting at the drill hole in the center, I tap small chunks of the knot and pry them out. Once again, the Red Ever Ready pops out easily but the Erskine is going to take a lot more work. The Ever Ready has a solid base with a deep (20mm) knot cavity, so other than some clean-out with a Dremel, it won't need much extra. The hole is 20mm wide, so I'll probably just enlarge it a bit and load it with a 20mm knot. The Erskine seems to be hollow and filled with plaster. This will take grinding with a Dremel bit to deepen it enough for a new knot. The hole is only 17mm across but it looks like I can open it up to 21-22mm and also load a 20mm knot. I'll wait to order knots until I have both totally cleaned out and holes enlarged.

That's it for today!

IMG_0029.jpg


IMG_0030.jpg


IMG_0032.jpg
 

Attachments

  • IMG_0031.jpg
    IMG_0031.jpg
    2.7 MB · Views: 7
Still making progress. I finished cleaning out the old cement/glue/plaster/rubber/whatever. The work was done with an electric drill down the center and then chipping away from the sides. It wasn't very difficult. My next step is to take the Dremel tool with a sanding drum and enlarge the openings on both brushes. Once I'm happy with the hole sizes, I'll measure them up and order the new knots. I'm not sure if I want to go synthetic or badger, but I'll decide once I see what's available in the sizes I'll need.

Cleaned Out.jpg
 
The holes have been enlarged to 21mm using my trusty old Demel tool and sanding drum attachment. Now that the sizes are set, I can start shopping for the knots. It looks like 20 mm knots will work well in these small handles.

The next step is polishing. I'm a fan of the Novus three-part plastic polishing compounds. I may not use #3 (Heavy Scratch Remover) since they are already in good condition without any deep scratches. I'll start with #2 (Fine Scratch Remover) and see if that works. I can always go back to #3 if needed.

Holes enlarged.jpg
 
Initial polishing is done. I was surprised to see some dark orange swirls show up in the red handle Ever Ready. Nice!

Knots have been ordered from The Golden Nib. I'm getting a 20 mm Synthetic Nylon 3 band and a 20 mm Finest Badger. I haven't decided which one will go into which handle. I'll see how they look when they arrive.

Now I just need to wait for the delivery.

After Polishing.jpg
 
Fantastic work !... these will be real treasures . What kind of cement will you use ?
I always use a two-part, waterproof epoxy. I've never had a brush fail me because of cement failure. But I would never want to try and remove and replace a knot. The old rubber or other adhesive originally used in these handles comes out a lot easier than modern epoxy!
 
The holes have been enlarged to 21mm using my trusty old Demel tool and sanding drum attachment. Now that the sizes are set, I can start shopping for the knots. It looks like 20 mm knots will work well in these small handles.

The next step is polishing. I'm a fan of the Novus three-part plastic polishing compounds. I may not use #3 (Heavy Scratch Remover) since they are already in good condition without any deep scratches. I'll start with #2 (Fine Scratch Remover) and see if that works. I can always go back to #3 if needed.

View attachment 1850937
Nice work so far. Don't be surprised if you still need to open the hole a little more once you have the knot in hand. And, by the way, the drum sander is available in different grits. You have one of the courser ones. It cuts faster, but the surface isn't as smooth as using one of the finer ones.

I got started on reknotting old handles on my grandfather's old Erskine and I've done a few since. I often use the drum sander when installing knots in new handles too.

Welcome to the addiction.
I don't bother using a finer grit drum since I'm just using it to open up the hole. If it's rough inside, it doesn't make any difference...although it might even provide a better surface for the epoxy to grab onto.

I'm quite comfortable with the addiction. Over the past 8 or 10 years, I've probably restored 30 or 40 brushes. It's been dormant for a while, but it flares up every now and then. :cool:
Just derailing your thread a bit ;)
I’m very happy with them.

D4672428-391C-4841-9B24-2E5C1AEFD16B.jpeg


E94E27D2-EF27-4361-8A7C-F90545BF202B.jpeg
 
Top Bottom