What's new

First hone setup?

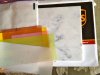
Bought a 8 by 12 inch marble piece (other choice was 3x6) and the last two sheets of films arrived:

12µ (yellow)
6µ diamond only 6x6 (brown)

I'll cut the 8x11 sheets in 3 pieces and the 6x6 into two. I'll update here.
 
Last edited:

Slash McCoy

I freehand dog rockets
I think it's more expensive through Thor. Not in a super rush to get this thing done. I decided to not go with the .3 micron film based on Slash's comments earlier. So I've got the other 3 sitting in my shopping cart ready to go. Just got a slab o' marble from Home Depot today.

What do you think of clamping the film with binder clips or something to the marble? Or is doing the adhesive the way to go? I guess I could even duck tape it to the underside of the marble. Hmmm.

Getting a little ahead of myself seeing as I have no films, haha!

Oh no... for FILM, just use plain old water. The film of water creates a vacuum sorta, that holds the film onto the lapping plate. Just make sure both plate and film are nice and clean, with no dust or debris. Wet the plate, and lay the film in plate. Smooth it out so there are no bubbles. The film should stay put pretty well. Sprinkle some water on top of the film, and you are ready to hone some steel.

You only need adhesive for some wet/dry sandpaper. And the binder clips will not hold it as flat as the adhesive will. Flatness is one of the big advantages of using this method, so don't do anything that would compromise flatness or smoothness.

If you use adhesive, be sure to clean your plate thoroughly before applying any film. Paint thinner or nail polish remover will work for cleaning up adhesive from your lapping plate. Any residue left will stick to the first piece of film you use, and that will attract dirt, which will mess up your nice flat smooth honing surface.

You could get a second lapping plate just for adhesive and wet/dry paper, and not have to worry so much about it.
 
Let me get this out of the way: I have never honed anything and I've been shaving with shavettes and straights for less than three weeks.

If it weren't for Slash McCoy's enthusiasm, informative posts and guidance I wouldn't have attempted to hone using lapping film. Thanks!

This is what I purchased all for less than forty dollars.

LAPPING PLATE
Marble 8 x 12 inches. A 4 x 12 would be the perfect size but Home Depot didn't have it; the other choices were 3 x 6 and 6 x 6.

LAPPING FILM (they arrived unlabeled)
12 micron (yellow) ~ 1K grit
6 micron (brown) ~ 4K grit
3 micron (purple) ~ 8K grit
1 micron (green) ~ 16K grit
0.3 micron (white) ~ 30K grit

I cut the lapping films in three pieces using the point of a very sharp knife. Most likely the lapping films would destroy scissors.

The razor, a Griffon 72 half hollow, could shave my arm hair and passed the Hanging Hair Test but the last two shaves weren't comfortable. The blade would tug and pull causing some irritation and razor burn. My goal was to improve the razor's sharpness in hope of resulting in better shaves.

1. I washed the lapping plate and left it wet. I grabbed the 1µ (green, 16K) lapping film and put the shiny side against the lapping plate. I poured some water on the 1µ film and smoothed it out. It stuck to the plate.

2. I did 30 laps with the 1µ leading with the edge using almost zero pressure. No feedback. I tested the razor by doing the HHT. It failed! I had done something wrong. It shaved some arm hair. I did another 30 laps; again no feedback. Same results. I didn't know what to do. I wasn't sure if I should go to CrOx or move forward into the progression by using the 0.3µ (white) film. I wondered if I was using the wrong side of the film. I looked at the film and there were some dark markings and my finger tips were stained a bit. I was removing metal.

3. I washed the plate and the film. I was sure I was using the right side of the film and decided to start from the beginning. The razor had been honed recently so there was no need to reset the bevel by using the 12µ (yellow) film. I began with 6µ and did at least 30 laps. No improvement in shaving arm hair. I gave up on the HHT.

4. Moved to 3µ (purple). At least 30 more laps. No improvement in shaving arm hair.

5. Moved to 1µ (green). At least 30 laps. Not much improvement in shaving arm hair.

6. Moved to 0.3 (white). At least 30 laps. Bald spot! It cut a big patch of hair with one stroke resulting in a bald spot! I was ecstatic! There was some feedback. The laps weren't as smooth.

7. Washed the lapping plate and film and left to dry. Wiped the blade dry with paper towel.

8. Stropped the blade on leather at least 50 laps. Blade passed the HHT.

Shaved with the razor and the improvement was very noticeable. The blade didn't tug and pull as it did before. There is still room for improvement. I want the blade to be sharper; it'll help on the ATG passes.

Needless to say I am very happy with my first attempt at honing. I was also surprised at how much I liked the process. Now I want a Coticule to compare the results :)

One mistake that I might have made was that after doing Step #2 (30 laps on 1µ) I should have moved to 0.3µ. I don't know.

The cool thing about honing using lapping films is that everything fits in an envelope as shown in the attached picture.

Again I am new and this is my first attempt at honing. Please feel free to correct me on anything including using wrong terms and honing mistakes.
 

Attachments

  • $HoneOnLappingFilm.jpg
    $HoneOnLappingFilm.jpg
    37.4 KB · Views: 164
Last edited:

Slash McCoy

I freehand dog rockets
Not a bad first attempt. Congratulations!

If you give it another try with the same blade, try coloring the edge bevel on both sides with a sharpie. Then go two and only two laps on your 1u film. Where there is still sharpie ink, your edge is not contacting your honing surface.

Another thing to try is to raise a burr by honing just one side of the blade on fairly coarse film, maybe 6u. Give it 50 laps or so, nice and light. See if you raised a burr. If there is a burr anywhere, then ideally there shoud be a burr along the entire edge. Hit the other side the same number of laps and see if you got a full length burr on that side, too. If you got a burr on both sides, go back to normal alternating strokes, about 30 laps, just to get rid of the burr, and then go through your progression. If you did not get a burr the whole length on both sides, you have some issues. The blade might be slightly twisted or have an inconsistent spine. You might have a bit of a frown or smile in the blade. The remedy is simple. Go all the way down to your 12u and attempt raising a bevel. When you finally get one, you can advance normally through your progression of films and you should have an excellent edge.

Be sure you are using proper honing technique. The spine must never lift off of the lapping plate. When that happens, you are rounding your edge. Also, watch out for a stabilizer or a shoulder that, when it rides on the film, elevates the heel of the razor off the film and presses the toe of the razor into the film. Pressure = very light? Not bending the edge on the edge of the plate?

The good news is that if your honing technique is good, more laps will eventually give you a nice edge.
 

Slash McCoy

I freehand dog rockets
I read your post again and gave it a bit more thought.
Let me get this out of the way: I have never honed anything and I've been shaving with shavettes and straights for less than three weeks.
The razor, a Griffon 72 half hollow, could shave my arm hair and passed the Hanging Hair Test but the last two shaves weren't comfortable. The blade would tug and pull causing some irritation and razor burn. My goal was to improve the razor's sharpness in hope of resulting in better shaves.
Part of your problem might lie in your shaving technique. Re-evaluate your angle and pressure. Also make sure you are reducing your beard sufficiently before going ATG.

1. I washed the lapping plate and left it wet. I grabbed the 1µ (green, 16K) lapping film and put the shiny side against the lapping plate. I poured some water on the 1µ film and smoothed it out. It stuck to the plate.
2. I did 30 laps with the 1µ leading with the edge using almost zero pressure. No feedback. I tested the razor by doing the HHT. It failed! I had done something wrong. It shaved some arm hair. I did another 30 laps; again no feedback. Same results. I didn't know what to do. I wasn't sure if I should go to CrOx or move forward into the progression by using the 0.3µ (white) film. I wondered if I was using the wrong side of the film. I looked at the film and there were some dark markings and my finger tips were stained a bit. I was removing metal.
1u will generally be too fine to use for bringing a dulled edge back to life. It is a finisher. However, 1u alone could be very good for regular maintenance of your edge.

3. I washed the plate and the film. I was sure I was using the right side of the film and decided to start from the beginning. The razor had been honed recently so there was no need to reset the bevel by using the 12µ (yellow) film. I began with 6µ and did at least 30 laps. No improvement in shaving arm hair. I gave up on the HHT.
6u will be a little coarse to get much of any result from HHT. After 12u or 6u you should visually examine your edge under a very strong magnifying glass in bright light. You should see a good flat reflection from the bevel. Remember, the edge of your bevel is the edge of your razor. So you should see the reflection like a nice flat mirror all the way out to the edge. Also turn the razor edge-up and look for any microscopic reflective spots which would indicate a flaw in the edge.

4. Moved to 3µ (purple). At least 30 more laps. No improvement in shaving arm hair.
At this point, if all is well, you should see some useful results from HHT. Shaving arm hair with the razor against the skin should be easy. This is after all equivelant roughly to an 8k Norton, and the edge should already be much sharper than the average pocketknife. The average pocketknife ought to shave your forearm hair with absolutely no problems.

5. Moved to 1µ (green). At least 30 laps. Not much improvement in shaving arm hair.
At this point, you should be able to wave the blade 1/4" above your arm, not even touching the skin at all, and it should lop the top off of some hairs.

6. Moved to 0.3 (white). At least 30 laps. Bald spot! It cut a big patch of hair with one stroke resulting in a bald spot! I was ecstatic! There was some feedback. The laps weren't as smooth.
7. Washed the lapping plate and film and left to dry. Wiped the blade dry with paper towel.
8. Stropped the blade on leather at least 50 laps. Blade passed the HHT.
Shaved with the razor and the improvement was very noticeable. The blade didn't tug and pull as it did before. There is still room for improvement. I want the blade to be sharper; it'll help on the ATG passes.
Needless to say I am very happy with my first attempt at honing. I was also surprised at how much I liked the process. Now I want a Coticule to compare the results :)
One mistake that I might have made was that after doing Step #2 (30 laps on 1µ) I should have moved to 0.3µ. I don't know.
No, the mistake was probably not starting with a coarser film. Remember, the finer the film, the more slowly it cuts. Possibly a couple hundred laps on the 1u might have done the trick. But the best way would have been to start with 3u or even 6u. When everything is as it should be, 0.3u will usually give you an edge that is a bit on the harsh side. Also now that you know what the feedback feels like, watch for it when using coarser films. When you start to feel that suction-y resistance, go another dozen laps and then change film, usually. That means that your current film has done pretty much all it can do to improve the edge.

The cool thing about honing using lapping films is that everything fits in an envelope as shown in the attached picture.
Again I am new and this is my first attempt at honing. Please feel free to correct me on anything including using wrong terms and honing mistakes.
The important thing is that you actually went hands-on and familiarized yourself with the tools. Your edge improvement gave you some gratification and confidence. You now have a base of experience to work from. You now know something about feedback. You now know that a finisher is too fine to be a fast sharpener. Now maybe you could try the whole process all over again, but begin by setting a whole new bevel, using all the tricks that you now know. The secret of course is to have a good, flat, full length bevel. Everything else just builds upon that. It is your foundation. Finer films just refine it and do not establish the geometry. Normally, needless bevel setting is wasteful, creating unneccessary wear, but it probably should be done this once. I think your original bevel is suspect, and also the experience will do you good. Look for the feedback from the coarser films too, before progressing to a finer film.

One advanced technique you can use on your final film is to add a piece of damp paper between plate and film. This creates a buffer and really helps to leave a smooth, comfortable edge. If you end with 1u, when you are satisfied with the edge, add the paper underneath the film and give it another dozen very very light laps. You will be most pleased with the results. If you end with .3u film, add the paper from the start. It will help tame the wildness of the .3u edge.
 
Very interesting concept honing on lapping films, never heard of it before. I wish you the best of luck Noah.
 
what about cutting the plate in half then you would have 2 4"x8" honing plates(one for film & one for wet/dry). Just got my films and thinking about going this route with the tile.
 
Amazon.

Norton Waterstone Starter Kit: 220/1000 grit stone, 4000/8000 grit stone, SiC flattening stone

129 bucks. delivered. I have that and the balsa strop from whipped dog as my beginner setup.
 

Slash McCoy

I freehand dog rockets
what about cutting the plate in half then you would have 2 4"x8" honing plates(one for film & one for wet/dry). Just got my films and thinking about going this route with the tile.

I think if he cut an 8" x 12" plate in half, he would have 2 plates 4" x 12". Minus the kerf loss, of course.
 
Slash - what's the difference between 12 micron lapping film (which is 1k grit right?) and a 1k wet/dry sandpaper? What do you think about 600 grit wet/dry sand paper?
 

Slash McCoy

I freehand dog rockets
Slash - what's the difference between 12 micron lapping film (which is 1k grit right?) and a 1k wet/dry sandpaper? What do you think about 600 grit wet/dry sand paper?

Well, I think a new piece of wet/dry probably cuts more aggressively. Also, more importantly, some vendors don't have 12u film. However, the film probably gives a more precise bevel. I am kinda guessing, actually, and I will wait for Seraphim and his microscope to tell it like it is. 600 grit? Good for repair. I have gone as low as 220 grit for really messed up blades. Coarser, in fact, I think. Use whatever it takes, for a basket case. Sometimes you just don't want to spend hours on a chipped or dinged blade, so a coarser, faster cutting medium sometimes makes sense. But remember you are gonna have to base your progression on your coarsest grit, so you are adding more stages. 600 grit would have to be followed by 12u film or 1k wet/dry. Keep the jumps between grits reasonable. Don't think that you can go straight from 220 grit paper to 5u film without a whole lot of rubbing. A good rule of thumb is to let each successive stage be no more than 4 times the grit number of the previous. Works for me, anyway. 2 to 3 times is better, when practical.

Just remember, the coarsest grit that you use does all the real work. Everything else just progressively cleans up the bevel, removing the scratches left from the previous stage. However, you can't shortchange yourself on the finer stages if you want to end up with a good shaving edge. Each stage should completely eliminate the previous stage's scratches, leaving its own finer ones. If any stage isn't carried to its maximum effect, you are either making a LOT more work for yourself on the next stage, or not gonna get the best possible edge.
 
Razor: Boker 20th Century 5/8 full hollow. Prior to honing the razor would shave some arm hair and couldn't pass the HHT. I went through the progression:

6 micron (brown) ~ 4K grit: 30 laps
3 micron (purple) ~ 8K grit: 30 laps
1 micron (green) ~ 16K grit: 40 laps
0.3 micron (white) ~ 30K grit: 50 laps. Cut a piece of paper slightly smaller than the film, put it on lapping plate, poured a bit of water and then put the film on top of the paper.

Didn't get a lot of feedback. 0.3 micron gave me the most feedback. Razor didn't pass the hanging hair test but could shave arm hair.

CrOX on balsa: 60 laps. Barley passed the HHT.
Iron Oxide on balsa: 40 laps. Slightly better.
Stropped on leather 60 laps.
Shaved in the morning; the edge felt very smooth and forgiving but no sharp enough.

I don't know what I am doing wrong. I am using very light pressure, maybe I need to increase it.

What's wrong is (almost) certainly bevel setting. Your progression should work if the bevel is set.

I razor can sometimes cut hair even if the bevel is not set. Use a marker on the edge. Let it dry, and then do 5 light strokes on the 1 micron film.

Look at the edge under magnification (and in good light) - you should see no sign of the marker. If you do see anything, go back to the 6 micron film for a while, then do the marker test again.

Also remember that you can use water on 3 M lapping film - it does help.

Finally, remember that it takes time to figure out how to hone. Don't get discouraged. Things will improve.

I have some wet/dry sandpaper and jeweler's loupe on the way. I'll do the marker test. I didn't mention it but I've been using water on the film. I know it'll take time and practice to get better; the good thing is that I like honing. Thanks for the feedback.
 
This is a really great thread. I'm thinking it should be stickied. I'm definitely going to go with lapping films because it's just so much more affordable to start.
Subscribed!
 
Well, I just received my order from Amazon, and as was suspected by some of you, the sheets were actually more like cloth. Pretty thick, and I don't think they would be sufficient for my tasks.

Crap.

Anyone interested in some polishing cloths?

I guess I'll try again, and use the other links some folks provided.
 
Top Bottom