What's new

From Start to Finish

So I got asked about how I rebuilt a button on a stem in another thread. So as not to derail that thread, and seeing as I had a very, very grimy Ehrlich State pipe in a bag of pipes that need A LOT of work I figured I'd document the restoration here.

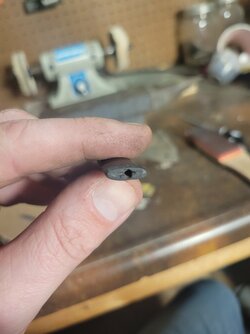
So this is what we are working with.

20250303_083944~2.jpg
20250303_083957~2.jpg
20250303_084010~2.jpg
20250303_084018.jpg
20250303_084059.jpg


So this pipe is GROSS, full stop.

I started by reaming the bowl, and low and behold, it was once Meer lined. I say once because most of the lining had crumbled and wasn't with the bowl anymore. I reamed what I could (used a pocket knife) and then took some Murphy's Oil Soap to the bowl. Meanwhile I had started soaking what is left of the stem in Oxiclean.

I scrubbed the bowl, then I scrubbed it some more, then, yup you guessed it, scrubbed it some more. I got it mostly clean, but the rim was torched. So I sanded the rim with some 600 grit sandpaper. After that I did a salt + alcohol treatment.

20250303_090600.jpg
 
Ok so instead of eating lunch today I sanded out the oxidation on the stem. Then I got to work building up the button area of the stem using CA glue and carbon.

You have to work quickly as the carbon starts to set the CA glue almost instantly, so you have to mix and get it on the stem very fast.

I build it up in layers to get some thickness built up. For those of you wondering, yes I did get CA glue and carbon on my WHITE kitchen table (who buys a white table?)

You can see how I have to build up the corner of the button, and some better shots of how it looks after getting it built up. It does not look pretty at this stage, but that's fine, most of it is going to get filed down anyways. It's just important that you have enough on there to work with.

20250303_133359.jpg
20250303_134544.jpg
20250303_134558.jpg
20250303_134608.jpg
20250303_134615.jpg


Ok now back to the meetings and other various work tasks and the CA glue to set up.
 
So I had a gap in my afternoon between meetings so I cleaned the bowl out and decided to remove what was left of the Meer lining. It was just a ring around the top of the bowl anyways so wasn't doing anything at this point. I also slightly rounded the inner and outer edges of the bowl rim as there were some chips in the briar. Since this is pretty much a total overhaul anyway and the original condition of this pipe wasn't savable (the Meer lining) I figured I'd make it look as good as possible.

I also took some steel wool to the bowl as there was still some grime on it.

20250303_171903.jpg
20250303_171919.jpg


It's tough to see in the photo above but because the Meer lining is no longer there the drilling is off, so that's something that will need to be addressed later.

Because the scrubbing and steel wool took a good amount of the original stain off I restained the bowl. I just did a quick contrast stain. The next photo is the darker stain while wet and then a photo of it dry after the lighter shade was applied.

20250303_172323.jpg
20250303_173231.jpg


It's got lovely grain! There are some small pits that were filled at the factory, but otherwise this is a nice hunk of briar.

Next up the misalignment of the draft hole need to be addressed, time to play in the mud!

So pipe mud, I've used it in the past to fix a Mark Tinsky that was given to me which had some burnout issues at the bottom of the bowl. In that case I used cigar ash and spit to make a paste. This time I used pure carbon and water. I'm aiming for a very "tight" paste consistency and I want to bring the bottom of the bowl up to better align with the draft hole. I use a pipe cleaner to keep the mud from clogging the draft hole. I want the bottom of the bowl to be at the same level as the bottom of the draft hole. You can use a light shined through the hole to judge progress. While I was working on the bottom I drew some of the mud up the walls to make the bottom slightly conical and to treat the, now, raw briar walls.
20250303_174512.jpg
20250303_174519.jpg
 
Ok, before packing it in for the day and going to enjoy some dinner and then an evening smoke I wanted to start on the stem.

I sanded the end of the stem flat on some low grit sand paper. You have to make sure you are holding the stem perfectly perpendicular to the sand paper or your stem will be skewed.

20250303_182533.jpg


I then set the new buttons. All I do here is take a small triangular hand file to file in a line of where I want the buttons. This is tricky as the CA material is rough and catchy. I just go slow at the start until the line starts to get cut in. In the next photo you can see that what will eventually become the button isn't an even width across the length, but I'll deal with that the next time I'm in the shop.

20250303_182526.jpg


Well that's all for today. I hope this is at least entertaining for you gents. As Red Green was fond of saying, "If the ladies don't find you handsome, they should at least find you handy".
 
Ok got a bit of time this evening to play sculpture. This is where the OCD can kick in hard and you can sand everything down to the nub you began with. So part of this is mentally preparing to accept less than perfection, at least for me, for right now. Also acknowledging that this isn't a pipe I will likely use much, but rather by doing this I can give new life to a tool that's likely older than me.

Anyway, got to hand filing, I should have taken a picture of the files, but forgot. So I evened out the button a bit and started shaping with the hand files. I want to get the rough shape done before drilling just in case there are any voids or for whatever reason I have to go back to the glue and carbon.
20250304_184427.jpg

20250304_184430.jpg


Once there wasn't anything thst required me to go back to the glue station I drilled and slowed the stem. I'll clean up the slot as best I can as I go. I really do need to get a better tool than the dremel wheels I'm using right now, but we work with what we have.

20250304_184432.jpg

20250304_190618.jpg


With the drilling done and no holes where there shouldn't be and all my digits still attached more filing.
20250304_190548.jpg

20250304_190551.jpg


The stem isn't symmetrical side to side and it is driving me crazy. I considered going back for more glue, but decided against it for the time being. Once I'm done with it, if it's still bothering me AND I don't get distracted I'll try and add some more glue and even it out.

There was some small voids that looked unacceptable on one side of the stem so I filled those with some CA glue and the stem is now drying so I'm done for the evening.
20250304_191652.jpg


Tomorrow is going to be a long day, spent mostly in a meeting room and then it'll be off to Steak night with my Dad (turning into a bit of a weekly tradition) so likely won't be able to get back at it for snother day. Cheers Y'all!
 

Attachments

  • 20250304_190635.jpg
    20250304_190635.jpg
    784.1 KB · Views: 3
Ok between waking up a bit earlier than I wanted this morning and traffic letting me get home from the boardroom I spent all day in, I got this pipe done. It's not perfect, but it should smoke, which is a big improvement from how it started.

I finished the rough file sanding and went to some wet sanding then the buffers on the stem and bowl. You can see the patch, and the photos make it look like it's got holes, but it doesn't. I think that may be where the carbon didn't mix properly. I'm pretty sure this could be avoided by taking more time and applying the glue/carbon on in layers as opposed to what I did which was chuck it on with abandon.

20250305_075823.jpg
20250305_075828.jpg
20250305_161320.jpg
20250305_161330.jpg
20250305_161336.jpg
20250305_161456.jpg
20250305_161515.jpg


So there you have it. I tried to be as honest with the pictures as possible. This is by no means anything close to what a pro would do, but this also wasn't a pipe worth that kind of money, so a good method to get it smoking again which cost a couple bucks in glue and carbon and some elbow grease.

Cheers!
 
Top Bottom