What's new

Should have known better

So I am pawing through an antique shop when I see this monster straight. It's an 8/8, German made with a worked spine with gold wash on the blade and tang. But the rust, it scares me. The tip is pitted away and crumbling, there is rust on most of the blade. But it is a 8/8 Solingen blade with worked spine and gold wash found in the wild. Tell the owner I like the blade, but the rust concerns me, may well turn into junk. we haggle, $10 passes hands, and now I own a 8/8 solingen blade with worked spine and gold wash. Did I mention the tortoise shell scales?

Get home, quick check on the net tells me I have a mid 30's SiGi straight razor by Wilhelm Boos Jr. Very cool. Then I start to sand, and the blade crumbles and snaps. Anybody interested in a shorty 8/8 blade with worked spine and gold wash on tang?
 
I have wanted to make a short blade so I can get to parts of my neck/chin easier. As long as the rest of the blade doesn't snap when sanded (or used), I would be interested. What kind of grind is it? I have been looking for a near wedge (though a near wedge with a broken tip is VERY hard to come by!) What do you want for it?
Thanks,
Wyatt
 
Thats a shame, looks like it was a nice blade before it was neglected :/

I believe it was. When I was haggling with the owner, I told him if it was in perfect condition, I would pay $50.00 for it. Oh well, got a nice pair of imitation tortoise shell scales out of it. I figure that I got this blade, a Gotta 120 5/8 razor and a razor hone for a great price, so now I have a Gotta, a hone and a set of scales for a good price.
 
I believe it was. When I was haggling with the owner, I told him if it was in perfect condition, I would pay $50.00 for it. Oh well, got a nice pair of imitation tortoise shell scales out of it. I figure that I got this blade, a Gotta 120 5/8 razor and a razor hone for a great price, so now I have a Gotta, a hone and a set of scales for a good price.

What an excellent attitude- sorry about your lost blade, it was at one time a beaut!
 
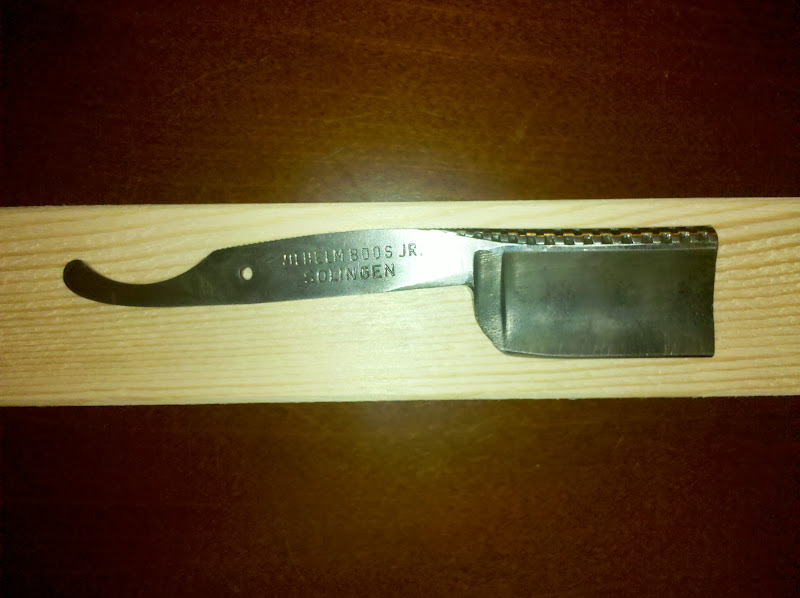
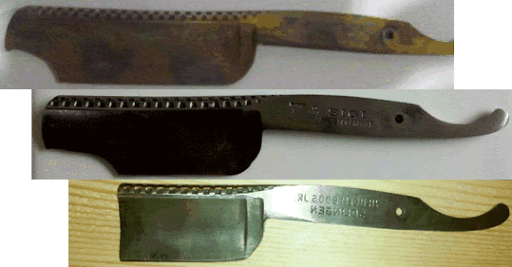
I was the lucky one that got the blade. I spent a lot of time working on it trying to remove the rust with sand paper, then trying with a dremel with a wire wheel. A lot of the rust was pretty deep, and unfortunately, a lot of gold wound up missing, so it all wound up going. I spent a bunch of time cutting the tip and rounding it nice, then on to honing it up! The edge was just about 2-1/8 inches long, just like I wanted! I found that the edge was warped pretty good towards the tip, so I thought I would try to bend it back. I guess it is the noob in me that thought this was a good idea. What do you all think happened? I will give you a hint, the tip of the blade had already snapped once and needed cut down... yep, snapped another 5/8 inch off the blade. I guess a couple good things come from this. I learned that bending a blade back is a bad idea, the warped section was now gone from the blade (fixed?), and I got to practice cutting a blade down again. This time I did a square tip, since I didn't want to spend a lot of time working it, and I like my other square tip blades. I got it honed up nice and sharp and finished on CrOx and leather. It shaves really well, but different. I think most of the difference is in not having scales to help stabilize the blade when shaving, but the top and bottom jimps help with the grip. Here's a picture of the progression of snapped tip, re-snapped tip, and final blade.
proxy.php

Looking back, I kind of wish I had put more time into re-rounding the tip for a second time, but there was so much deep rust right along the edge I wasn't sure that there would be a savable edge when all things were said and done. Oh well. Here's the best picture my phone was able to take of the finished razor.
proxy.php

Now I will have to figure out how to make some scales.
 
It looks like a very nice cheese knife!
(no offense intended, I'm just joking :tongue_sm)

I wasn't sure what to use the blade for if the pitting anong the edge made it unusable as a shaving razor. A cheese knife would have been a good idea! I think a rounded tip would have helped it's appearance... I have thought about putting a barber's notch in it, but I'm not sure how much that would actually help the appearance. I am not complaining, just saying I am open to suggestions.
 
What did you use to cut off the end? Your Dremel? I have a similar situation with a blade I got recently. It's a no-name brand with no scales too but I did a couple of test WTG passes and it did alright:001_smile
 
What did you use to cut off the end? Your Dremel? I have a similar situation with a blade I got recently. It's a no-name brand with no scales too but I did a couple of test WTG passes and it did alright:001_smile

I used a Dremel with the cutoff wheel. I had five wheels, and hoped that would be enough (since they came with the Dremel and I didn't want to go in search of more at just that moment) and I used a fraction of one to do both cuts. I also used another bit to help with the rounding when I did the first cut.
I thought it would be difficult, but it was very easy.
Hints:
  • Draw out your pattern with a sharpie. I checked out this page for some basic tip patterns to start with, and decided which looked best, was most functional, etc. Way easier than trying to eyeball it. After you make your preliminary cuts OUTSIDE that line, decide where some needs to come off and continue working.
  • Clamp the blade to something that won't move, like a shop bench or deck railing. I used my quick grips and made sure they were good and tight. This leaves both hands to work the Dremel, and no hands on the blade. If you angle the blade toward the bench/railing, you can use the bench/railing for support on your arm for a more precise cut.
  • Wear eye protection!
  • Make sure the blade you are using isn't cracked. A Dremel spins fast, and a flying piece of a blade wouldn't be fun to have in ones face.
  • Go slow. Don't expect to make the cut in 10 seconds, rather a few minutes
  • Keep things cool with a spray bottle of water. I sprayed it a few times during each cut. Lots of people get worried about the temper of the blade, but I know the temper isn't in serious danger until the metal starts changing colors (unless things have changed since I was in college), but I don't want to grab a hot sharp blade either.

Yep! I've made about 3 shorties from 3 broken blades this way. The dremel works good for this. Keeping it slow and cool works great. I then round or clean it up on my belt sander, that way you don't have to do much precision work with the dremel, just cut the bad part off.
 
The "JR." in Wilhelm Boos Jr. stamped on the tang helps me imagine that the blade is supposed to be that short.

Some short scales might make this a cool "travel" razor. Or maybe the almost square blade shape could look really neat with a fixed handle, sorta like a micro-cleaver.
 
Well, duh! This would make a great starter for my 5-year-old...

Yikes!

It's nice just to see folks trying to make something useful out of something that most others would have tossed long ago. There's a lot of spirit in that "Jr."
 
Papafish, I think you did a great job shortening down the blade. You describe the shave as "Different" Do you figure that is more due to the lack of scales(so far) or because you are now using a large,wide, short blade?
 
Papafish, I think you did a great job shortening down the blade. You describe the shave as "Different" Do you figure that is more due to the lack of scales(so far) or because you are now using a large,wide, short blade?

The wider blade took me about 3 passes to get used to, so I don't think it's at all that. My face is so angular that I rarely use more than an inch or two of the blade at a time, so I would also say the length of the blade isn't the cause. At this point I would point all my fingers at it not having scales, since I use the scales to help maintain the angle of the blade on my face. I guess when I get some scales made and put on, I will be able to see if that's really the case!
 
Top Bottom