What's new

Found brush gets new life

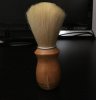
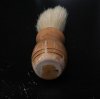
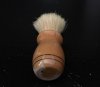
A few days ago, my mother-in-law found a brush that her husband had bought a while ago (he's been living in Armenia for the last decade). She knew that I had started wet shaving and offered it to me. It looks like he bought it and never used it. However, it was stored in a way that seemed to damage the lacquer/sealant or whatever. I don't see any brand name on it so if anyone can identify it, that would be appreciated, but I'm not too concerned about brand name, just curious.
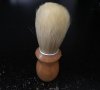
the not is tight and dense so I'm looking forward to restoring and using it.
 

Attachments

  • $image.jpg
    $image.jpg
    29.3 KB · Views: 173
  • $image.jpg
    $image.jpg
    34.9 KB · Views: 170
  • $image.jpg
    $image.jpg
    31.9 KB · Views: 169
  • $image.jpg
    $image.jpg
    26.8 KB · Views: 169
  • $image.jpg
    $image.jpg
    32.7 KB · Views: 169
150grit and wetted to see how a clear coating (tung oil, boiled linseed oil, truoil, etc.) would look.
dont think I like the way the darker areas stand out.
I'm thinking of giving it a dark red mahogany-esque stain and burning something into the end or recreating the original lines with the burner.
Any suggestions are very welcomed.
This is the first brush I'm refurbishing.
$image.jpg$image.jpg$image.jpg$image.jpg$image.jpg
 
Beautiful brush. I'm sorry I can't help because I've never tried to refurbish a brush but I'm going to follow this thread along to hopefully learn. Keep us updated!
 
It reminds me of a "Surrey" brand brush. Nice job. I would have never thought to take the wood down to it's natural state. I'll be following and leaning too.
 
Thanks for the kind words and info. It does look like a Surrey brush. Not just the shape but the double band seems to be a marker. I'll have to think of how to incorporate it into the final layout.
I'll keep updating bad I progress along.
 
Some of my fav brushes to restore are strongset brushes. They have what I would call there standard model and it is a cheap wood brush that they coat in a plaster of sorts and paint. The plaster is super thin. These are all over eBay and look like crap most of the time cause the paint is always all chipped up or crazed. All this means to me is I get them dirt cheap.
I then strip to bare wood, sanding and steel willing very well. Then to bring out the grain and character/appearance of age I use orange shellac, 1-2 coats, steel wool between coats. I then finish with 2-3 coats of spar urethane. They look amazing and feel great in the hand. I honestly think the most I have paid for one is 4 bucks not including shipping and often they go for $5 shipped. I put a Virginia Scheng boar knot off of eBay that I get 6 of for the ridiculous price of only $22 (yes for all 6!)
I have 3 in three sizes in my collection but these are what I give as gifts along with my homemade shave soap.
I shared all this one to give you a finish idea and two if you have enjoyed this process check out the bay for the strongsets and knots I mentioned. You can have a blast, make a beautiful & very functional vintage brush, and do it dirt cheap.
Awesome. I really appreciate the tip. I might follow that same path as a way to get more miles under my feet in brush restoring. sounds very affordable and , as you said, is a great gift idea.
 
I stained it with three coats of Cherry Red from Stewart MacDonald for a bottom coat. I like the grain pattern, but not to happy with the dark spot covering the end. We'll see if it adds or detracts from the look in the end. No pun intended.
$image.jpg$image.jpg
 
Sanded down after Cherry Red staining with 150 grit. I tried not to sand some areas more than others, but still wound up with two lighter colored rings around the widest and narrowest areas. I'll try and ignore these areas in the next go-arounds with the mahogany staining.
$image.jpg$image.jpg$image.jpg$image.jpg$image.jpg
 
Still using 150 grit.
$image.jpg
I taped off the areas that tended to lose the first stain faster than the rest of the handle.
$image.jpg $image.jpg $image.jpg
Sanded down with the tape on. Not trying to take too much off, just reduce the color.
$image.jpg
This is what it looked like after I removed the tape.
 
Wow, what a great thread. I don't restore old brushes; but, I would like to. Keep up the good work and most especially keep those pictures coming. Thanks
 
Took everything down with 400 grit and placed pencil lines.
$image.jpg $image.jpg $image.jpg $image.jpg $image.jpg
I tried to get the pencil line as close to where the original lines as I could according to the earlier pictures, but didn't measure the original placement so it is a guess.
 
Top Bottom