What's new

Tips & Techniques - All Things Cooking Related

DoctorShavegood

"A Boy Named Sue"
I love good tips and Techniques for cooking, gadgets and BBQing. Something to make it all easier, faster or more efficient. Post your tips here. It could include drinks, food or fire. It could be a tutorial, pictures or videos.

Teach us something.

Here's a simple one:
$QNkCi2c.jpg
The fork is keeping the taco from falling over while your're trying to load. It also works with two taco shells.
I normally use the square bottomed taco shells, but If you can't find them this works pretty well.

Here's another one that produces little waste:
$9a2e862a4474b03a8f57077312f9b32f.jpg
 

DoctorShavegood

"A Boy Named Sue"
OK, no one has posted a tip. Let me ask a few questions to help jog your memory.

1. How do you like to block your brisket before smoking?
2. What kind of mat do you stand on in the kitchen while cooking?
3. What kind of steel do you use with your knives and what's your technique?
4. How to you get the silver skin off the back of baby back ribs?
5. Tell us how to filet a fish.
6. What makes your tomato sauce better or different the Joe's?
7. What is your technique in boiling an egg where the shell comes off without sticking?
 
4. How to you get the silver skin off the back of baby back ribs?

This one is actually super simple! There are two membranes on the back of ribs, the inner and the outer. You only want to remove the outer, if you remove the inner, the bones will literally fall out of your ribs when they are cooked.

Take a knife and get under the corner of the membrane near a bone on the end and get it lifted away. Once you have a portion of it up, take a dry paper towel and use that to grip the membrane. Try to pull off as one continuous piece, if it looks like it's starting to rip, reposition your grip with the paper towel. When done well, it will all come off as one long strip!

7. What is your technique in boiling an egg where the shell comes off without sticking?

This works for me, doesn't for my wife, take it with a grain of salt!

Add your eggs to a pot then cover with cold water, to this add ~1T of baking soda and put a lid on the pot. Place pot on the stove and turn to High, once the water begins to boil, take the pot off the stove and set a timer for 15 mins. At the end of cooking dump hot water out of pot and replace with cold water and let sit for another 15 mins. Then take your eggs and crack them pretty well all over, eggs should come out pretty easily.

It helps to use older eggs.
 

DoctorShavegood

"A Boy Named Sue"
My technique for the boiled eggs I got from SulleyBob, another member here.

Bring a pot of water to boil. Carefully place an egg straight out of the frig. into the boiling water. Don't let the egg bounce to the bottom or it will crack. Boil for 13 minutes (for a moist but firm yolk). Put hot egg into a shock bath of ice water. Once cooled tap the egg around it's circumference cracking the shell. It peels off easily.
 
Last edited:
The Minion Snake Method for low and slow smoking in a Weber Kettle.

The "Minion Snake" is a method of charcoal briquette setup based on the "Minion Method". It is particularly well-suited for a Weber kettle. With this setup I can get a solid 6 hours -- sometimes more -- of almost perfect 225° temperatures with little to no fussing. The "real" minion method is a way of setting up your grill so that a small amount of lit briquettes are placed in the middle of a pile of unlit ones. The fire then slowly moves through the pile, giving a long burning, low heat fire. For an explanation, see this: http://www.smokingmeatforums.com/a/minion-method-explained-with-tutorial

This is a modification of that method, providing even lower heat, and taking advantage of the shape of the Weber Kettle to allow the whole center of the grill to have indirect heat and plenty of smoke.

The setup. Take all the grates out of your grill and clean the majority of ash from the bottom. It seems to work best if you leave about a 1/2 inch coating of ash in the bottom. Replace the bottom grate(the coal grate). Make two lines(rows) of briquettes around the perimeter of the grill going about 3/4 of the way around. Then make another row around the perimeter on top of the first two. You're essential making a series of 3-piece pyramids nestled next to each other. Scatter some smoking wood along the first 1/2 of the ring. Place a couple of bricks in the middle.
You can see it this picture:
proxy.php


Fire off a 8-10 briquettes to the white ash stage. (I use a chimney starter, but you could use another grill, or even just place the pile at the (left) end of the snake and start it with lighter fluid.) When the briquettes are lit add them to the left end of the snake. (unless you used the lighter fluid method.)

Place a small pan of water on the bricks in the center. If you use a short cake sized pan it should fit underneath the regular grate nicely. This is a drip pan and adds moisture to the environment inside the grill. I use water, some people use juice. Personally I've never noticed that using juice changes the flavor in any way, but it's up to you.

Open the bottom vent all the way. Put on the regular (food) grate and cover the grill. Open the top vent all the way. Place a thermometer through one of the top vent holes. It should be one that is accurate in the 200-300° range. Allow the grill to come up to 200° or so.

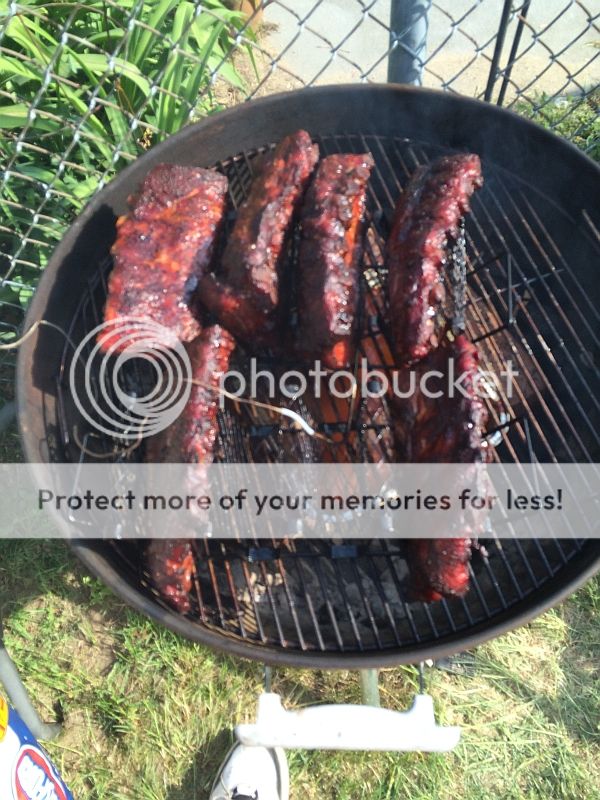
Get your previously prepared ribs (i.e., rubbed, marinated, etc) ribs. I like to cut full racks in half. Arrange the ribs on the grill. If you're only doing a single rack you can probably just lie it on the grate. If you're doing more, you'll need to rig something to hold them standing on their edges. I found some "taco racks" for grilling at Home Depot that work very well. (The link goes to the same racks on Amazon)

This picture is 3 full racks, cut in half and placed in the taco racks
proxy.php


Put the cover back on the grill and let the heat come back up to about 200°. Then close the top vent about half way. This is where you'll have to mess with it for a little bit. Depending on wind, ambient temperature, how well your grill is burning, etc. you'll have to mess with the top vent every 10 minutes or so until it stabilizes where you want it. I like to smoke baby backs at 225°F. The top vent for me is usually about 1/2 way, and the bottom is fully open. I rarely have to adjust the bottom vent. Once it's stabilized, it should run pretty well on it's own.
Depending on how you laid out the ribs, you may want to rotate the food grate around (or just move the ribs) to keep them from being too directly cooked. Also occasionally rotate the cover so that the vent is on the side most opposite from the current area of burn -- that will pull the maximum amount of smoke over the the meat.

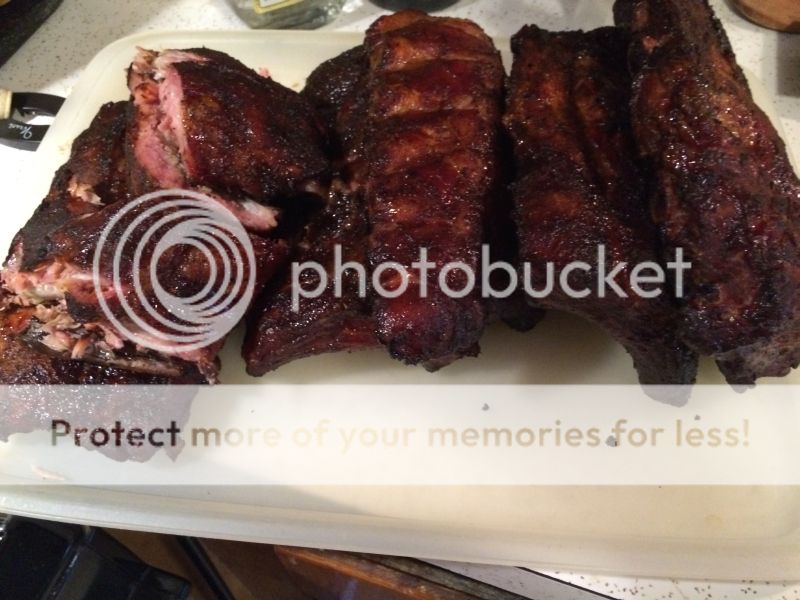
For baby back ribs I find that about 6 hours is the sweet spot. An instant read thermometer inserted into the thickest part of the meat between the bones should be about 190-195°F for it to be just short of falling apart.
I've also done brisket this way, but it has to be a small one that will cook in 6-7 hours. For a bigger one, you can wrap it and finish it in the oven -- the smoke will have done it's job by then anyway and you will just be finishing the cooking.)


ENJOY!
proxy.php
 
Last edited:
Eggs
Surprisingly the only real key to easy to peel hard boiled eggs are OLD EGGS. Farm fresh eggs straight out of a chicken will not peel very easily. If you buy farm fresh eggs, "age" them in the fridge for at least a week. Otherwise, I use that basic technique.

The only difference is I put the eggs in cold water, bring to a boil, remove from the boil and let sit for about 18 min, then ice bath.

Avacado
I see a lot of people struggle with Avacados. Slice long ways around the pit. Hit the pit with a chefs type knife, then twist to remove it. While wearing cut resistant gloves, slice or cube up the avocado while still in the skin, then scoop it out with a big spoon.

Burgers
I find they hold their shape better if you form the patties, then let them sit in the refrigerator for at least an hour.
 
That's awesome Jim!! Thank you. I want to incorporated that somehow with my rectangular Charbroil pit.

I don't see why it wouldn't work if you lay out the coals similarly. I don't know exactly what model grill you have, but if it's a typical rectangular model it would probably be fine. Because the bottom of your grill is (probably) flat not rounded like the kettle, airflow to the coals might be a problem, but some creative airflow direction with some bricks might do the trick. Yo could also use the regular Minion method on one end with the ribs on the other...
 
Last edited by a moderator:

DoctorShavegood

"A Boy Named Sue"
Eggs

Avacado
I see a lot of people struggle with Avacados. Slice long ways around the pit. Hit the pit with a chefs type knife, then twist to remove it. While wearing cut resistant gloves, slice or cube up the avocado while still in the skin, then scoop it out with a big spoon.

This is what I do. It might surprise you that folks don't know this one. The neighbors came over the other night. We made fajita's, guac., etc. The neighbors wife asked if she could help. I said just scoop the avocados out and place them in the bowl. I turned back around and she was using a fork....:blink:
 

DoctorShavegood

"A Boy Named Sue"
I don't see why it wouldn't work if you lay out the coals similarly. I don't know exactly what model grill you have, but if it's a typical rectangular model it would probably be fine. Because the bottom of your grill is (probably) flat not rounded like the kettle, airflow to the coals might be a problem, but some creative airflow direction with some bricks might do the trick. Yo could also use the regular Minion method on one end with the ribs on the other...
I have a crank to move the coals tray up and down. I can lower it to be in line or just above the side vents. Then just put ribs on the other side. In times past I would just load one side of the tray with unlit coals in a pyramid pattern then put a few hot coals on top. I like your stacking method better though and may need to arrange some bricks to achieve it.
 

Claudel Xerxes

Staff member
For perfectly cooked white rice, use 2 parts water (or stock/broth) to 1 part rice.
Bring the water to a boil in a pot.
Once the water is boiling, add the rice, stir immediately for a few seconds, then place lid on pot.
(Do not remove the lid after this point until you are ready to fluff the rice)
Keep decent heat going on the pot going until you hear the liquid starting to boil again.
Once the liquid is boiling again, turn heat down to a light simmer.
Cook rice for 20 minutes from when the rice went into the boiling water.
After the 20 minute cook time is up, turn heat off and the rice sit for 10 minutes.
After the 10 minute "rest" time is up, it's now time to remove the lid and fluff the rice.
Serve and enjoy!
 

DoctorShavegood

"A Boy Named Sue"
For perfectly cooked white rice, use 2 parts water (or stock/broth) to 1 part rice.
Bring the water to a boil in a pot.
Once the water is boiling, add the rice, stir immediately for a few seconds, then place lid on pot.
(Do not remove the lid after this point until you are ready to fluff the rice)
Keep decent heat going on the pot going until you hear the liquid starting to boil again.
Once the liquid is boiling again, turn heat down to a light simmer.
Cook rice for 20 minutes from when the rice went into the boiling water.
After the 20 minute cook time is up, turn heat off and the rice sit for 10 minutes.
After the 10 minute "rest" time is up, it's now time to remove the lid and fluff the rice.
Serve and enjoy!

Thanks Claudel.

That's how I like to do it too. I had a rice cooker but it always seemed to burn the rice. I have a Japanese friend who said she washes her rice real well before cooking with this method.
 

Claudel Xerxes

Staff member
Thanks Claudel.

That's how I like to do it too. I had a rice cooker but it always seemed to burn the rice. I have a Japanese friend who said she washes her rice real well before cooking with this method.

I agree that it is good to wash the rice first, but truth be told, I rarely wash mine when I make it. :blush:
 
That's for long grain rice, right? Short grain like basmati or jasmine rice only needs 10 minutes or so cooking time
 
My brown rice method creates rice that's not overly chewy. Put enough water in a pan to cover the rice plus a couple inches. The pan needs to have a fitted lid. Now bring the water to a boil add at least 1 tsp salt to this water. Now add your rice now continue on a low boil for 20 minutes. Toward the end of this cooking time collect a couple tbsps water. Now drain the water off the rice and put the reserved water with a tbsp butter or so put an old kitchen towel that's clean then add lid and over low simmer cook 20 minutes more and serve after letting the pan rest 5 minutes.
 
Top Bottom