What's new

GD Prep

No interest in saving them?? What if you come across another TI that needs scales?:laugh:

Thanks for the tips.


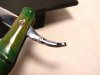
Ha,,, I was wondering if anyone remembered me doing that. I told you his response didn't I ? He liked using the blade, but thought the scales were a bit snug!

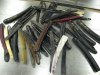
As far as saving them,, even the ones I pop off in seconds , using a cool running stone are still salvageable.. With 10 sets around ,, and a shoe box full of others, i don't think I'll need to keep many.
 
Oh yeah, these things aren't exactly fussed over when they're made. Any number of ways to get these scales off quickly. For me, as I've said have no real reason to keep at present 10, which I'm sure will grow quickly besides the others I have.
As a note, I just went over the blades again as some were not touched up after the initial shaves, you should see them go now! It always make me laugh.
 
Last edited:
I use a pair of wire clippers to chop off one end of the pins to demount the scales. Or just hit them up with the bench grinder....

attachment.php
 
Yup,, doesn't take much.
What surprises me though in a thread devoted to prepping and working on a blade that will ultimately be responsible for slicing hair from your face, and a piece of steel that can be highly modified in any number of ways, how much has been focused on, and fretted over, how to remove .10 cents worth of scales that will in all probability be tossed.
I can see them on my next Wade and Butcher resto. That'll look good won't it? LOL,,,
 
Well, rescaling seems like a more popular endeavor than total spark shooting dremelization, so it seems logical folks are interested in that aspect.

But, yeah, they're destined for the trash heap, so no need to be fussy about removal...
 
I use a pair of wire clippers to chop off one end of the pins to demount the scales. Or just hit them up with the bench grinder....

attachment.php


I'll see your white scales,, and raise you my blacks! and some reds, wood, tortoise, blonde horn,and,,,,
 

Attachments

  • $IMG_1320.JPG
    $IMG_1320.JPG
    141.9 KB · Views: 819
Well, rescaling seems like a more popular endeavor than total spark shooting dremelization, so it seems logical folks are interested in that aspect.

But, yeah, they're destined for the trash heap, so no need to be fussy about removal...

True, true,, I apologize,,
 

Legion

Staff member
Mark, that video had my hair stand on end at 1:19 when you slid those razors across the table into each other.

I'm afraid I'm going to have to take them into protective custody after seeing that.
 
Mark, that video had my hair stand on end at 1:19 when you slid those razors across the table into each other.

I'm afraid I'm going to have to take them into protective custody after seeing that.

Ha,, that caught my eye as well. But hey, I built them , whatever happens to them I can handle it. No damage done. And they're not so delicate. Sort of....
It was my first video and I made stupid mistakes. But then I don't baby too many things in my studio. Besides,, they're like the Doritos commercial, I can always make more.
 
hey there, I just got a few GDs to try out but I don't quite understand some steps..


How do you correct uneven spine thickness? I have a GD that has toe to heel 5.9mm, 6.05mm, 5.9mm.. how to i actually correct this?


"The last pic. Well this is going to get changed most likely but on these as well as any other blade I play with the crookedness of the tail drives me nuts where it sweeps up into the shaft. I just have to straighten this transition. This way too, it's something I don't have to be concerned with later as I lay out Jimps,, or do whatever I decide to do in this area. It's right, and I can just measure , mark and play. The middle one is really bugging me."

I don't really understand this part.. what do you mean crookedness of the tail? how do you straighten this transition?


"Up to now I haven't removed the stamping. In this, and the cases I've seen so far it's this side that needs to be ground to 1. eliminate the stamp obviously and 2. to get the blade to center in the future scales. In the first shot you can see the blade is way off because of the fullness on the stamp side. Grind this away, pop them back in , check , pop them out, ,,, well ,, you get the idea. Just do it until you get the blade to center."

How do you remove the stamp of the razor? Grinding on a belt sander? i tried sanding but it doesnt seem to be working.. for this step.. am i supposed to keep sanding only the stamp area? or the whole razor including the spine?


Thanks a million! i know thats a whole lot of noob questions but its my first time!
 
To remove the stamping on the blade I just wiped it off with "Goo Off". Sanding wasn't working very effectively and the "Goo Off" took it off immediately.
 
I'm not so meticulous when it comes to removing the scales from a GD. Since their scales are cheap garbage, I'll just snap off the plastic near the hinge pin and take a pair of snips to the pin. The old scales just go in the trash when I'm done anyway.
 
I save the scales for other projects. Found that you can wipe them with acetone and then stipple them or paint them or crackle finish them and they look very acceptable. Not junk at all if compared with mid or low priced older razors.

$stippleddollar-small.jpg

To get the metal stamping off, I use a belt sander (got to be a bit careful). To even the spine, same thing only even more careful. ;-} Keep it cooled and don't dip the edge onto the belt else you can ruin it. Use a Dremel and a buffing wheel with abrasive compound to dress up the spine so you can't see the witness marks. I've also just used a DMT and taken the spine down if it wasn't in bad shape. Tang in the above picture is cutoff by the black cloth - it really isn't that thin.
 
@ Paperplane89,
Unevenness in spine thickness isn't really a major issue as the most important thing to watch for is how the edge will contact a hone. You can see in the pics how i used black marker on the spine as well as the edge to see that the contact of the edge was even all the way across. If it's not, you can adjust this by altering the spine where it makes contact with the stone by grinding some of the spine to allow it to hone evenly. If this isn't taken care of you'll find you have to resort to "rolling X strokes" or whatever to try and get an even hone on the edge. I'd rather fix the problem which is pretty easy and end up with a blade I can just lay on a stone and hone it up without resorting to gymnastics.
The transition on the tail is the area where it sweeps into the back of the spine. I don't know why this bugs me as it's found on vintage blades as well. If you look at the photo of the three razors side by side the curve where the tail meets the spine is even on the outer two razors but on the middle one it's crooked and curves up to the left. It doesn't affect a single thing so far as the razor is concerned but I see it as an esthetic thing. If I'm taking care of everything else why leave this one thing untouched? A pass or two with a stone in a Dremel type tool evens it right out and now it looks straight.
Removing the stamp can be done several ways from using a stone in a Dremel, a grinding wheel or whatever you have at hand. Don't concentrate in one area as you'll end up with a depression or divot in this area. Blend it out to the surrounding areas for a smoother transition which will ease sanding it smooth for a nice finish.
One thing to watch for here is that you don't make one side of the tang uneven from the other. If this happens the blade will always be off center in the scales. You can watch for this happening by pressing just the tang area of the shaft against a smooth surface and watch how much of the tip of the blade lifts. If it is lifting evenly on both sides you have a winner. If it lifts higher on one side,, you have to remove material from the opposite side to keep it symmetrical.
Maybe I get too anal about these things but it does go quickly after it's done a couple of times and when you're done you have a blank you don't have to worry about as everything is in order.
You won't have to rock it,, or roll it to get it sharp, you won't have to shim, or grind out the insides of the scales to get the blade to center. These are simple checks and remedies to square away a blade. And,, it'll show you quickly if you have a blade that is just junk and you shouldn't waste your time on.
Though if you treat it like a blank , you can fix most anything.
 

Slash McCoy

I freehand dog rockets
Good point. It is really nice to have a blade that you can just flat-hone without having to put a bunch of fancy English on it. I don't like a blade that I have to use rolling x's on, though I use that technique a lot on vintage unrestored razors just to get them shaving.
 
I know many of you have seen these before but for anyone new to the site here are some examples of some blades and a case I built for my Gold Dollars. Some have contacted me with questions about them so I thought it might be helpful to someone to see them together.
And here is a recently completed GD in a theme. Spine and tail carved to resemble bamboo, the scales are real bamboo that were also carved to mimic the plant.


Pages 15 and 16 cover them.
http://badgerandblade.com/vb/showthread.php/273180-Competition-3/page1


Attachments

  • $IMG_2755.jpg
    $IMG_2755.jpg
    29.3 KB · Views: 716
  • $IMG_2756.jpg
    $IMG_2756.jpg
    29.6 KB · Views: 713
  • $IMG_2757.jpg
    $IMG_2757.jpg
    31.1 KB · Views: 714
  • $IMG_2758.jpg
    $IMG_2758.jpg
    27.6 KB · Views: 709
  • $IMG_2762.jpg
    $IMG_2762.jpg
    31.9 KB · Views: 710
Top Bottom