What's new

DIY Acrylic scales

Very informative thread! A good read and you provided some valuable information to the guys who like to tinker with restorations and such.

I could add a couple small points. The configuration of the wedge should be so that the spread of the scales forward of the pivot should be in the neighborhood of a quarter inch wider than the thickness of the blade you are using. The pic of yours is spot on, it appears. All a person would have to do is temporarily pinch the scales against the wedge with your fingers to get this measurement. Once the angle of the wedge is good, go ahead and peen/glue them.

While the point of not gluing the wedge to the scales has validity for the reasons that were stated, I like to super-glue mine. You could always clamp everything together with 0-80 nuts and bolts to see if there are going to be issues with blade drift toward either side of the scales. The combo of tensile strength of the glue and the shear strength of the pin is a good combo. Pinless scales for acrylics will work because the glue used for that type of plastic actually fuses the material together. However, pinless isn't a good idea on other materials. The joint almost always fails with even less-than-moderate use.

I have sketched a little drawing describing the dynamics of the relationship between the blade/scales/wedge work.

Stretch or reduce the length of the scales to get as close to these measurements as you can. To get a rough length from the pivot pin hole to the end of the scales, you need the length of the blade from pivot hole to tip of the blade and add 9/16ths inches. I think that math adds up, anyway...

View attachment 138551

View attachment 138550
 
Almost forgot: I drill these holes in the scales when they are flat. Drill the front ones first while the scales are still together. Drill the holes at the back separately (didn't want to say, 'butt holes') after you have drawn where the wedge goes. Drill the hole through the one scale where it belongs at the wedge. Use a sixteenth rod in the front to assure alignment, clamp them temporarily, and then drill the other hole in the opposite scale, using the first hole back there as a guide.
 
For what it's worth, I make a rough wedge, oversized (sticking out past the scales), and finish the inside surface that will face the blade. Then I glue it to one scale, with white glue or whatever. Now I can sand the exposed side to the shape I want - the thickest part to set the blade where I want it, and taper it so the scales will "spread" the way I want them - say an extra 1/8 inch over the thickness of the blade. After the wedge has been pinned, or fixed temporarily with screws, then I shape the exposed part of the wedge to the scales and finish my sanding.
If what I wrote isn't clear, feel free to ask questions. I prefer to do it this way so I don't have to hold a tiny piece of material while I sand it to shape - I can use the scale to hold on to.
 
I've got a question Mr. legion. Did you utilise any of signwriting stores in Canberra? I'm keen to try out your method since they produce such a unique result.
 
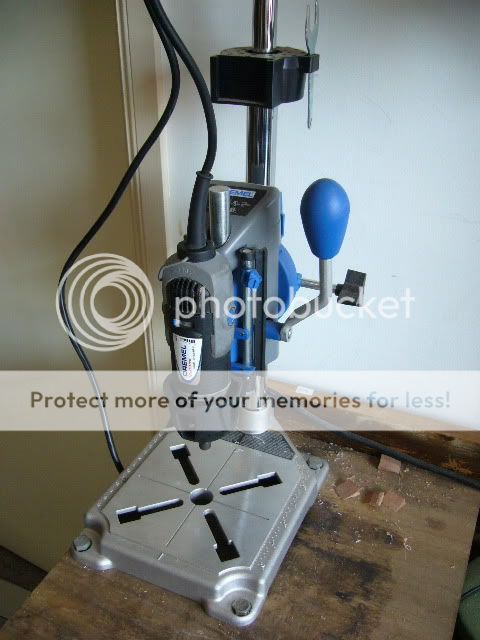
Next you want to drill a 1/16 hole where the blade is to be pinned. Now IMO this is the ONLY part that really needs a power tool. All the other parts can be done by hand if you are patient. But if you do not drill this hole perfectly straight your blade will not travel straight in the scales, and it will probably catch the edge. You need a drill press. One possible alternative is this attachment for the Dremel. It is not very heavy duty but for this sort of small work it is fantastic and takes up very little space.

proxy.php

So I'm reading this thread and think I'm about to try to make my first scales this looks like a great little press for my dremel so I go out and I get one. What I didn't consider about using it with my dremel on acrylic is my dremel is a 200 series only 2 speeds fast and faster. I'm gonna guess that at 15000 rpm it's going to melt the acrylic. So I grab what I have right now while I'm waiting on my acrylic sheets to arrive and grab a beat up broken set of plastic scales and give it a quick try. Yep melted all over the bit leaving a large hole. Guess I'll have to throw down some extra cash for a 3000 series dremel.
 

Legion

Staff member
Hmmm.... I'm not sure about that one....

My Dremel is one of those variable speed guys, and I do use it at the lower end when I am drilling...

Alternative two (and what I actually use now) Is go buy a small drill press. You may find that cheaper than one of the high end Dremels. Worth a look. But make sure the chuck can close right down to 1/16.

But having a Dremel go at slower speeds can be handy for polishing, sanding, etc...
 
I went and got a Dremel 3000 series it works much better.The 285 I have is just too fast to be comfortable using on razors. I can't get a small press as I live in a 27' RV travel trailer so that's out of the question as far as room goes. This I can take apart to store easily.

By the way great tutorial.
 
I don't know if this is right or not, but in my head it checks out. Taper the wedge and it makes the scales slightly bowed out, when you flip the blade around to shave position, instead of adding tension to the scales, it takes them more to neutral.

Also, the bowing out creates more space for centering the blade.

That could be right out of'r but it makes sense to me and just plain looks great.

Another reason is that the tang area that holds the pivot pin generally tapers from the spine thickness - you therefore need to create a bow using a tapered wedge otherwise the spine will catch and you would have to force the blade into a closed position. This is obviously not desirable as it means that, when opened again, the blade is likely to be loose when in the shaving position. I guess the amont of taper from spine to tang dictates the taper required on the wedge.
 
Another reason is that the tang area that holds the pivot pin generally tapers from the spine thickness - you therefore need to create a bow using a tapered wedge otherwise the spine will catch and you would have to force the blade into a closed position. This is obviously not desirable as it means that, when opened again, the blade is likely to be loose when in the shaving position. I guess the amont of taper from spine to tang dictates the taper required on the wedge.
Correct about the taper, it depends on how the tang is tempered.
One drawback to gluing the wedge on both scales is if the tang of the razor is not strength and it catches to one fo the scales one has to make new scales.
I glue the wedge only to one of the scales then I can adjust if the blade does not center.
 
At what degree angle should the wedge be? Should it be a trial and error thing that I just sand until, once the wedge end is clamped, I have a 1/4" gap at the pivot?
 
Top Bottom